|
you must have worked and understood the content of Module 5 about coding before you can follow this lesson. |
1. Create a new project
Take the same steps as in this lesson in Module 1.
2. Creating the main screen of the app
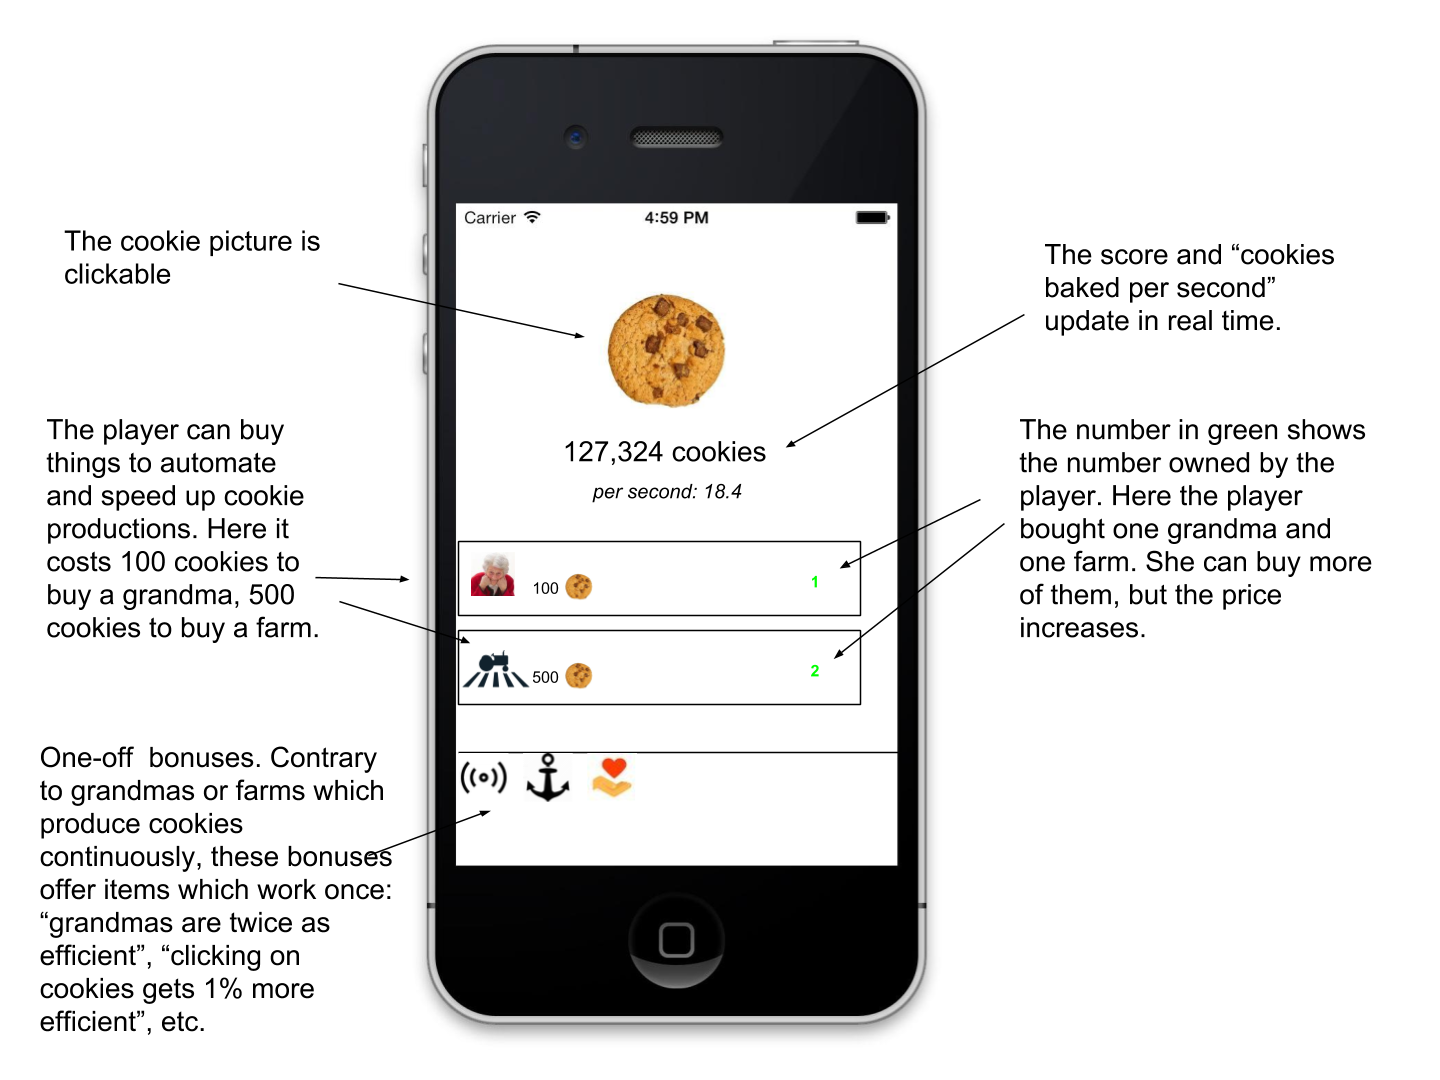
The main action of the game takes place on a single screen:
So the first step is to create this screen. We will not use the GUI Builder for this (contrary to previous lessons) as it is too slow and unpractical for a complex app like this one.
Follow these steps:
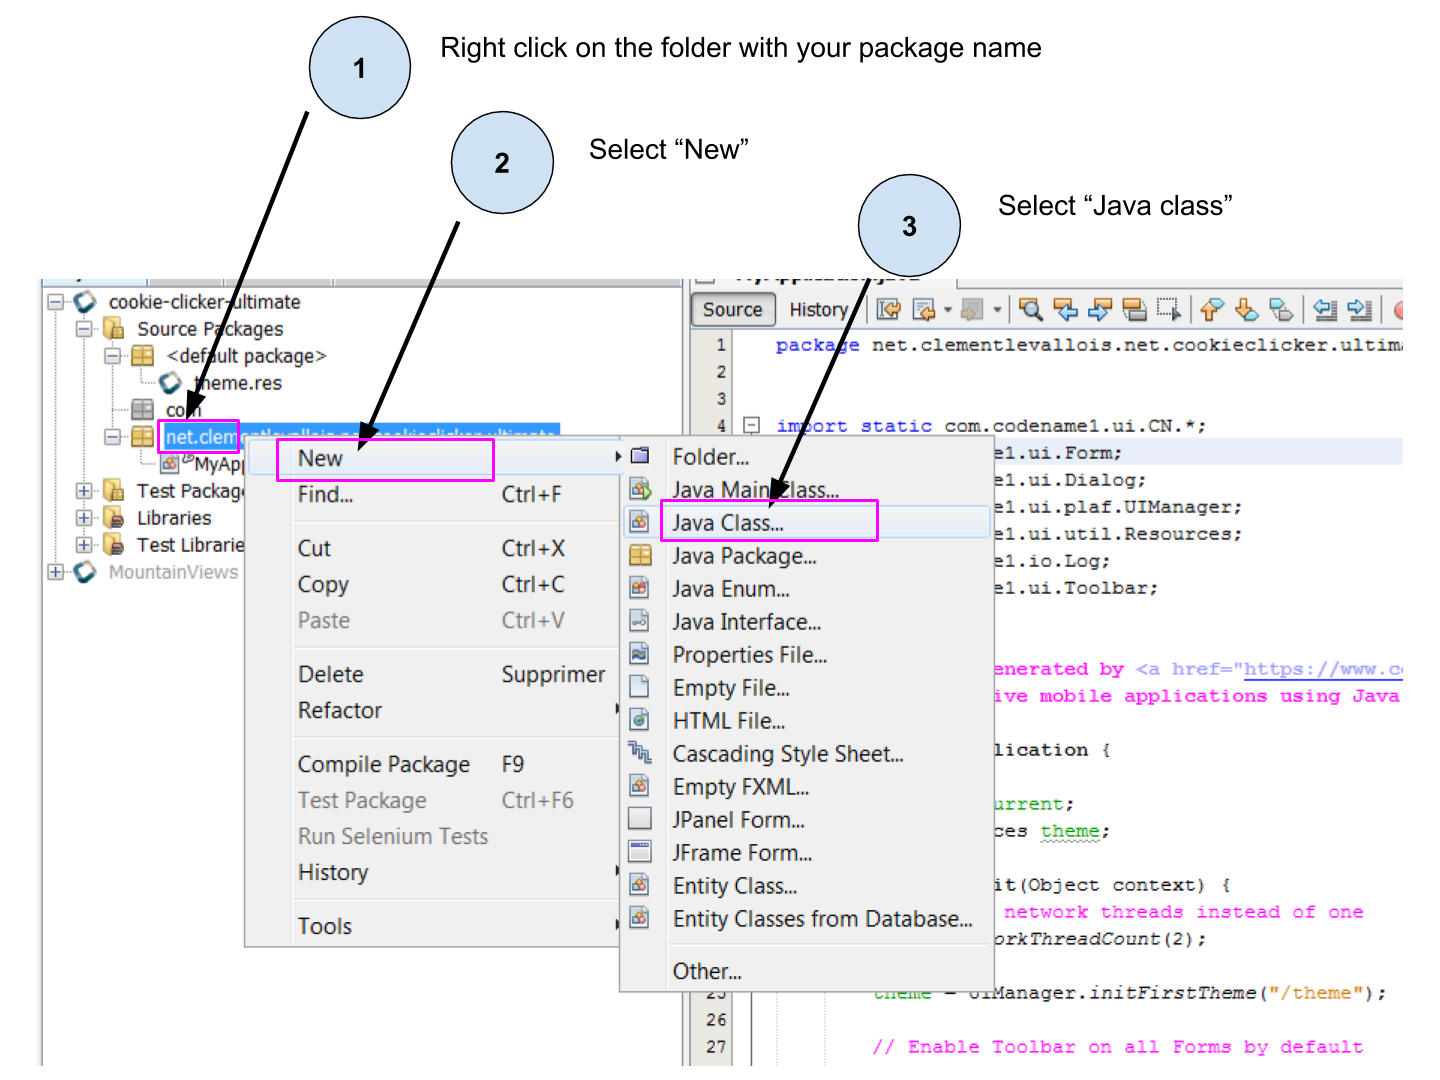
In the window which opens, leave every parameter unchanged except for the name of the screen:
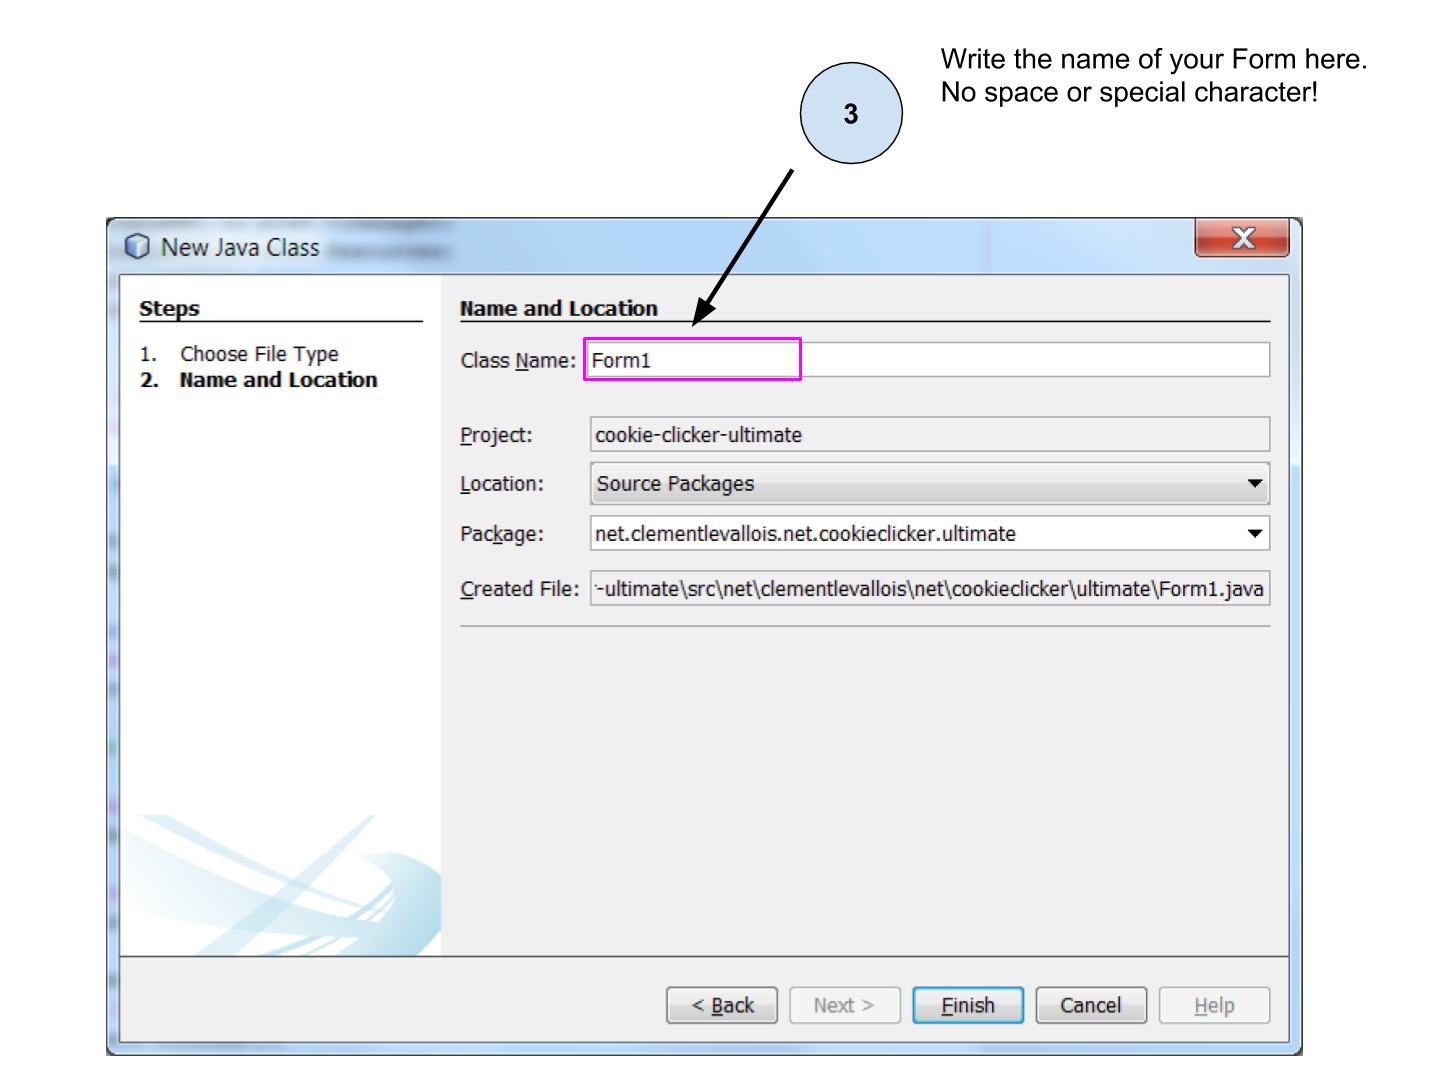
This creates a file name Form1.java (if you chose Form1 as a name).
If you remember the lesson on methods and classes in Module 5, you should realize we just created a class.
The role of classes is to organize the code in different files and sub-units, for a cleaner style of coding.
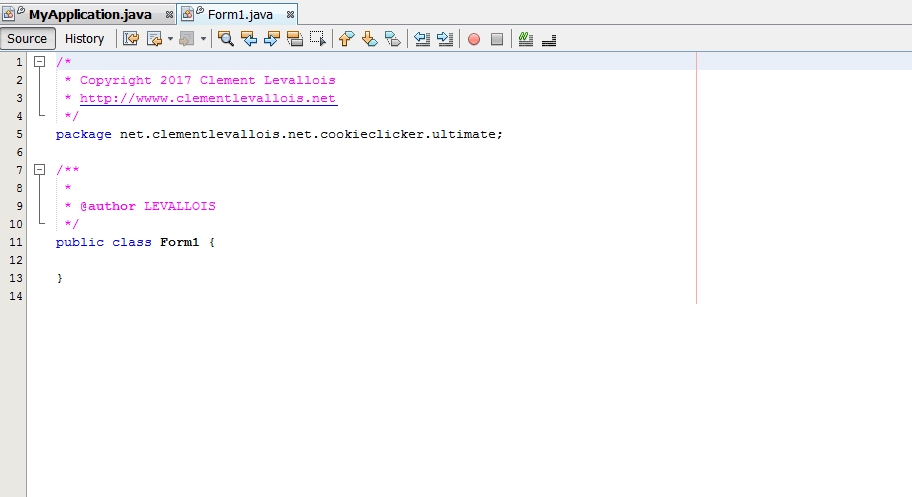
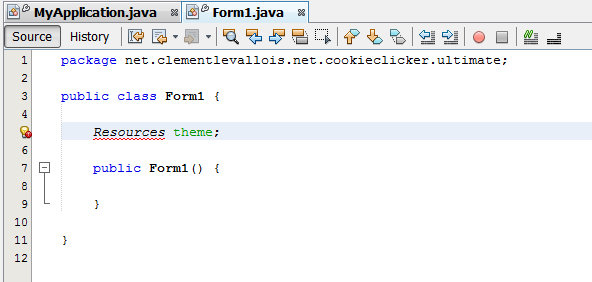
At the moment the class is almost empty:
Let’s add a last element to the definition of this class:
package net.clementlevallois.net.cookieclicker.ultimate;

public class Form1 extends com.codename1.ui.Form {  (1)

}| 1 | we added extends com.codename1.ui.Form before the { |
What does it mean? We just said that the class we created (Form1) extends another class, named com.codename1.ui.Form
→ our class Form1 just inherited of all the methods of the class Form!
→ inherited means that whatever a Form is capable of doing (having Labels in it, be in a BorderLayout or GridLayout, have a title, a background color, etc.), our class Form1 inherited these methods and so, it can do it as well!
With all this setup done, we can define the variables we need for our screen.
3. Creating Variables
Next, let’s add our first variables:
package net.clementlevallois.net.cookieclicker.ultimate;

public class Form1 extends com.codename1.ui.Form {

  Resources theme = Resources.getGlobalResources();  (1)

}| 1 | our first variable! It is an object useful to access the pics we imported in the file themes.res. It is instantiated with a static method. |
a. Error signal when creating a new variable
You should have the same error signal as this one  :
:
Follow the steps to fix the error:
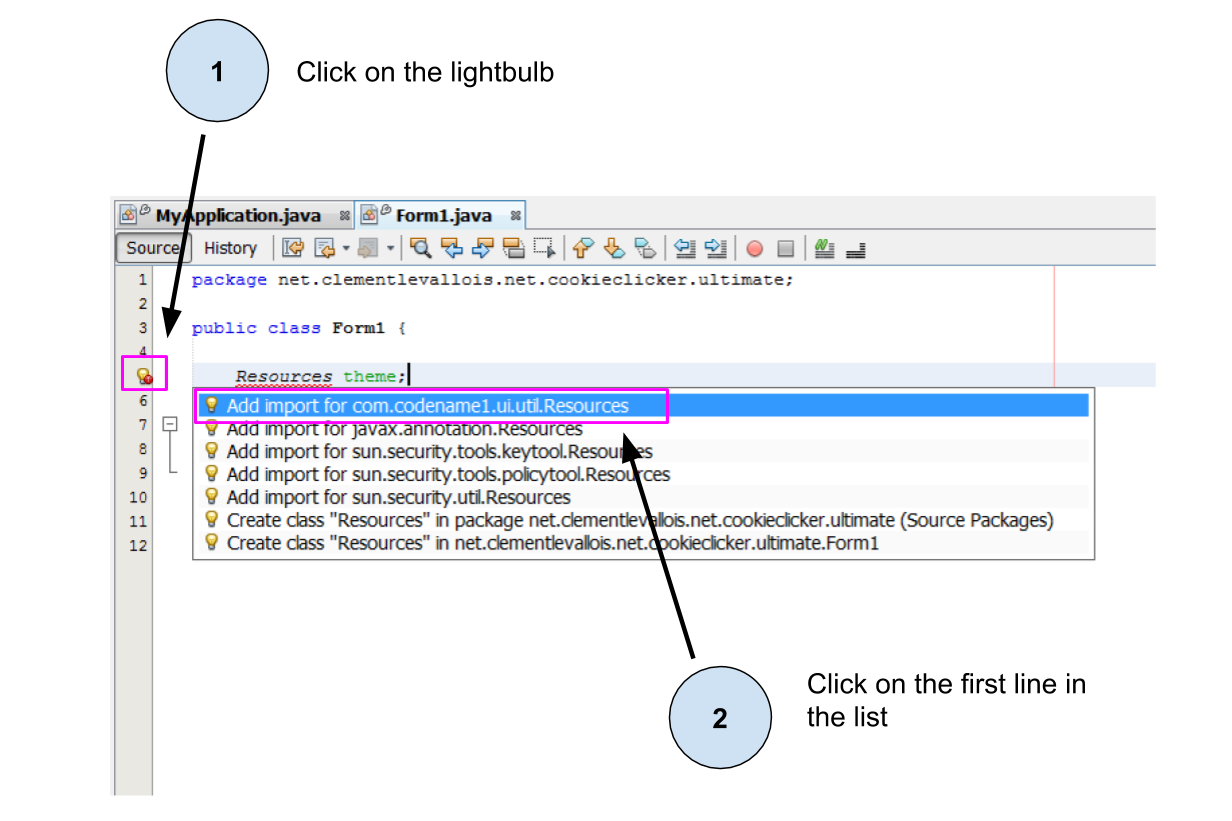
The result is a new line import com.codename1.ui.util.Resources; near the top of our file:
package net.clementlevallois.net.cookieclicker.ultimate;

import com.codename1.ui.util.Resources;   (1)

public class Form1 extends com.codename1.ui.Form {

  Resources theme = Resources.getGlobalResources();

}| 1 | the line NetBeans just added fo us. |
What you did is simple:
-
you created a variable of type
Resources, but this type is not included in the basic package of Java (which just includesString,Integer, etc.) -
We must tell Java where to find it so that it can import it:
-
we chose
Add import for com.codename1.ui.util.Resourcesbecause the typeResourcescomes from Codename One, indeed.
This error icon will appear each time you use a new type in your code: just click on it and pick "Add import for…" If you don’t see this option available, it probably means there is an error in your code.
b. Creating variables for the images we added to theme.res
So we’ll have pictures in our app.
We import them as usual (see Module 2 via the file themes.res:
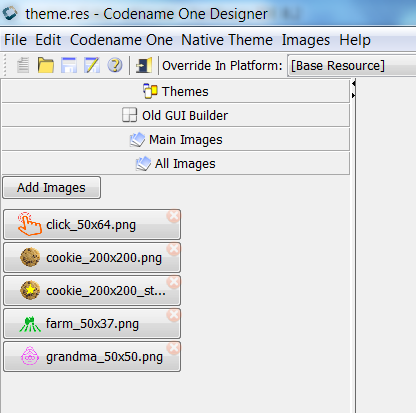
Here is the list of pictures to download so that you can import them:
Download this zip file with all pictures or find them below:
Once you have imported these pictures, how can we use them in our code?
package net.clementlevallois.net.cookieclicker.ultimate;

import com.codename1.ui.util.Resources;
import com.codename1.ui.Image;   (1)

public class Form1 extends com.codename1.ui.Form {

  Resources theme = Resources.getGlobalResources();
  Image farmPic = theme.getImage("farm_50x37.png");
  Image clickPic = theme.getImage("click_50x64.png");
  Image cookieCentraPic = theme.getImage("cookie_200x200.png");
  Image cookiePressedPic = theme.getImage("cookie_200x200_star.png");

}| 1 | fixing the error signs in the margin adds this line |
4. Creating a special method: the "Constructor"
Still In this class, below the variables we just created, write 2 lines of code, so that the entire file looks like:
package net.clementlevallois.net.cookieclicker.ultimate;

import com.codename1.ui.util.Resources;
import com.codename1.ui.Image;

public class Form1 extends com.codename1.ui.Form {

    // here  are our variables, I don't rewrite them to save space

    public Form1() {  (1)
    } (2)

} (2)| 1 | the function should have the same name as your class: Form1 in this case. |
| 2 | Don’t forget that there are two } to close at the end! |
    public Form1() {  (1)

} (1)| 1 | anything we write between these 2 curly braces will be executed when Form1 is instantiated. |
You recognized this as a method. It is a method of a special kind: when the class is instantiated, it will run (just once).
Another way to say it is: "when the objet Form1 is built, this method defines how it is constructed."
For this reason this method is called a constructor.
5. Creating the layout of the Form in the constructor
I mentioned that anything written here would be executed when the Form is instantiated:
    public Form1() {  (1)

} (1)| 1 | this method will be executed when Form1 is instantiated |
So we are going to write our layouts there, so that they get into place right when the Form gets created.
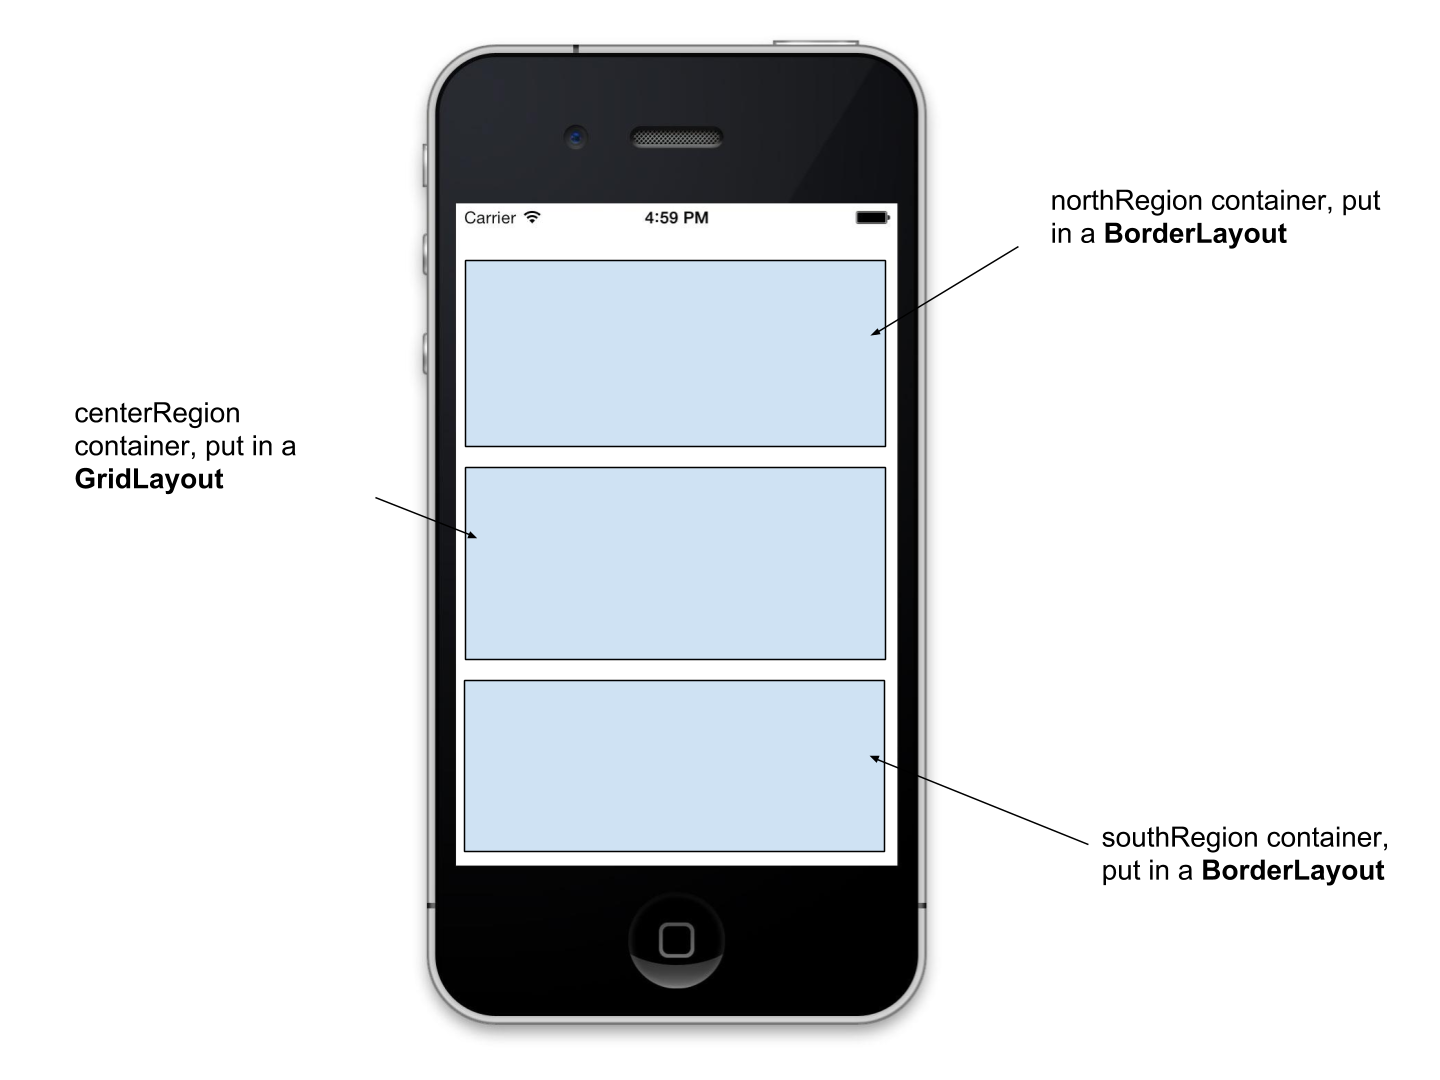
I suggest we organize the screen in three big regions:
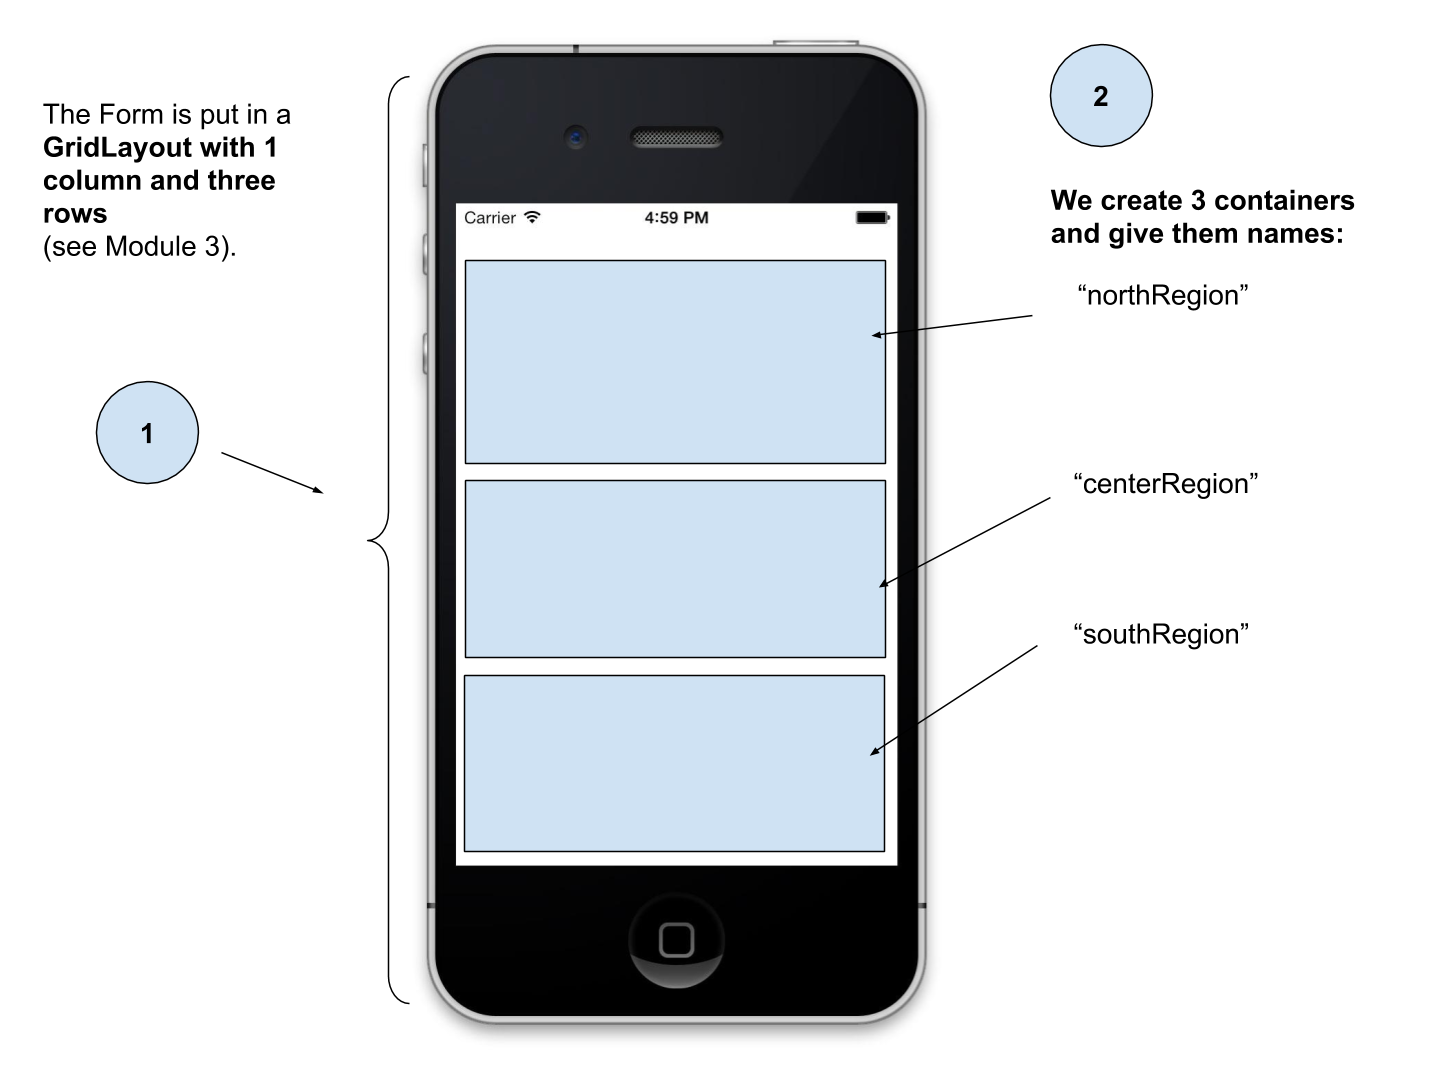
Putting the Form in a GridLayout (see the lesson on the GridLayout) will help us divide the screen in these three regions. BorderLayout might have been another option.
The idea is to have something like this:
Let’s define all of this for our Form, with some code:
// these lines of code should go inside  public Form1() { }

GridLayout gridLayoutThreeByOne = new GridLayout(3, 1); (1)
this.setLayout(gridLayoutThreeByOne); (2)
this.setScrollable(false); (3)| 1 | we create a Grid layout: 3 rows, to divide the screen in three equal spaces. |
| 2 | Form1 is the file where this code is being written, so we can name it with the keyword this. The Form has a method setLayout which we can use to assign a layout to the Form. |
| 3 | this method says the Form can’t be navigated outside of the screen. |
We now have a Form, set in a GridLayout. We must put many things in each of the three rows of the Grid.
To organize things, we’ll add a container for each region, and our Components will go inside these containers:
// these lines of code should go inside public Form1() { }
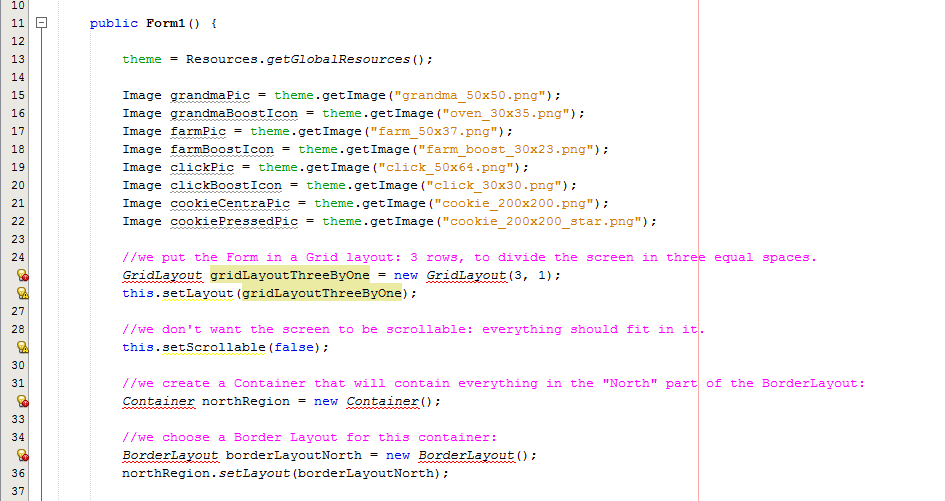
//we create a Container that will contain everything in the "North" part of the BorderLayout:
Container northRegion = new Container();
//we choose a BorderLayout for this container:
BorderLayout borderLayoutNorth = new BorderLayout();
northRegion.setLayout(borderLayoutNorth);// these lines of code should go inside public Form1() { }
//we create a Container that will contain everything in the 2nd row of the screen:
Container centerRegion = new Container();
//we choose a Grid Layout for this container:
GridLayout gridLayoutFourByOne = new GridLayout(4, 1);
centerRegion.setLayout(gridLayoutFourByOne);
//we set this region to be scrollable, because there is too much content to fit
centerRegion.setScrollableY(true);// these lines of code should go inside public Form1() { }
//we create a Container that will enclose everything in the 3rd row:
Container southRegion = new Container();
//we choose a Border Layout for this container:
BorderLayout blSouth = new BorderLayout();
southRegion.setLayout(blSouth);We created several containers, but it doesn’t mean they are in our Form yet.
We need to add them:
// these lines of code should go inside  public Form1() { }
this.addComponent(northRegion);
this.addComponent(centerRegion);
this.addComponent(southRegion);
While you write all of this, the new variable types have not been imported yet, so you will see error signals all the way.
Simply click on the error icons and select the first line "Add import for …" :
With all this code we have written, the entire file Form1.java should look like:
(for your convenience you can also download the file of this Form here)
package net.clementlevallois.net.cookieclicker.ultimate;

import com.codename1.ui.Container;
import com.codename1.ui.Image;
import com.codename1.ui.layouts.BorderLayout;
import com.codename1.ui.layouts.GridLayout;
import com.codename1.ui.util.Resources;

public class Form1 extends com.codename1.ui.Form {

    Resources theme;


    public Form1() {

        theme = Resources.getGlobalResources();

        Image grandmaPic = theme.getImage("grandma_50x50.png");
        Image farmPic = theme.getImage("farm_50x37.png");
        Image clickPic = theme.getImage("click_50x64.png");
        Image cookieCentraPic = theme.getImage("cookie_200x200.png");
        Image cookiePressedPic = theme.getImage("cookie_200x200_star.png");

        //we put the Form in a Grid layout: 3 rows, to divide the screen in three equal spaces.
        GridLayout gridLayoutThreeByOne = new GridLayout(3, 1);
        this.setLayout(gridLayoutThreeByOne);

        //we don't want the screen to be scrollable: everything should fit in it.
        this.setScrollable(false);

        //we create a Container that will contain everything in the "North" part of the BorderLayout:
        Container northRegion = new Container();

        //we choose a Border Layout for this container:
        BorderLayout borderLayoutNorth = new BorderLayout();
        northRegion.setLayout(borderLayoutNorth);


        //we create a Container that will contain everything in the "Center" part of the screen:
        Container centerRegion = new Container();

        //we choose a Grid Layout for this container:
        GridLayout gridLayoutFourByOne = new GridLayout(4, 1);
        centerRegion.setLayout(gridLayoutFourByOne);

        //we set this region to be scrollable, because there is too much content to fit
        centerRegion.setScrollableY(true);

        //we create a Container that will contain everything in the "South" part of the BorderLayout:
        Container southRegion = new Container();

        //we choose a Border Layout for this container:
        BorderLayout blSouth = new BorderLayout();
        southRegion.setLayout(blSouth);

        // we add the three containers to the Form, which is in a Gridlayout (three rows)

        // The northRegion will be in the top row because we add it first,
        // The centerRegion will be in the 2nd row because we add it in second
        // The southRegion will be in the 3rd row because we add it last.
        this.addComponent(northRegion);
        this.addComponent(centerRegion);
        this.addComponent(southRegion);
    }
}
6. Instantiating this Form when the app launches
Just like we did since the beginning of this course, we need now to add a couple of lines of code in MyApplication.java so that our Form1 opens when the app starts:
public void start() {
    if(current != null){
        current.show();
        return;
    }
    Form1 mainScreen = new Form1();(1)
    mainScreen.show();(2)
}| 1 | we instantiante Form1 ! This will trigger the constructor of Form1, so our layout defined with code in it will be created! |
| 2 | we show the Form on the screen. |
If you click on the preview ![]() you will see your app:
you will see your app:
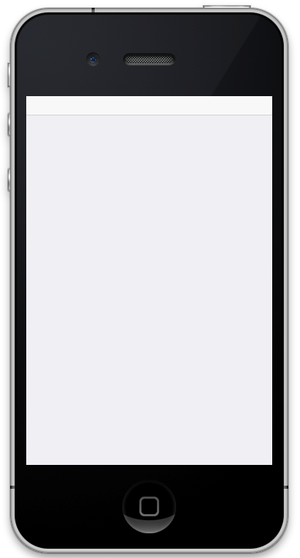
Still empty? Yes, but it is ready to include pictures, buttons and text! Let’s do this in the next lesson.
The end
Questions? Want to open a discussion on this lesson? Visit the forum here (need a free Github account).
Find references for this lesson, and other lessons, here.
Licence: Creative Commons, Attribution 4.0 International (CC BY 4.0). You are free to:
-
copy and redistribute the material in any medium or format
-
Adapt — remix, transform, and build upon the material
⇒ for any purpose, even commercially.
 This course is designed by Clement Levallois.
Discover my other courses in data / tech for business: http://www.clementlevallois.net
Or get in touch via Twitter: @seinecle