//-- DON'T EDIT ABOVE THIS LINE!!!
public void onUpdateLabelTextCommand(com.codename1.ui.events.ActionEvent ev, com.codename1.ui.Command cmd) { (1)

} (2)CODAPPS
Adding Labels and Buttons to a Form
last modified: 2018-03-16
'Escape' or 'o' to see all sides, F11 for full screen, 's' for speaker notes
1. Some preparations
Not sure what a Form is? Have a look at the previous lessons!
To start this lesson, we will assume that you already created a Form called "Form1" and that you opened it in the GUI Builder, like this:
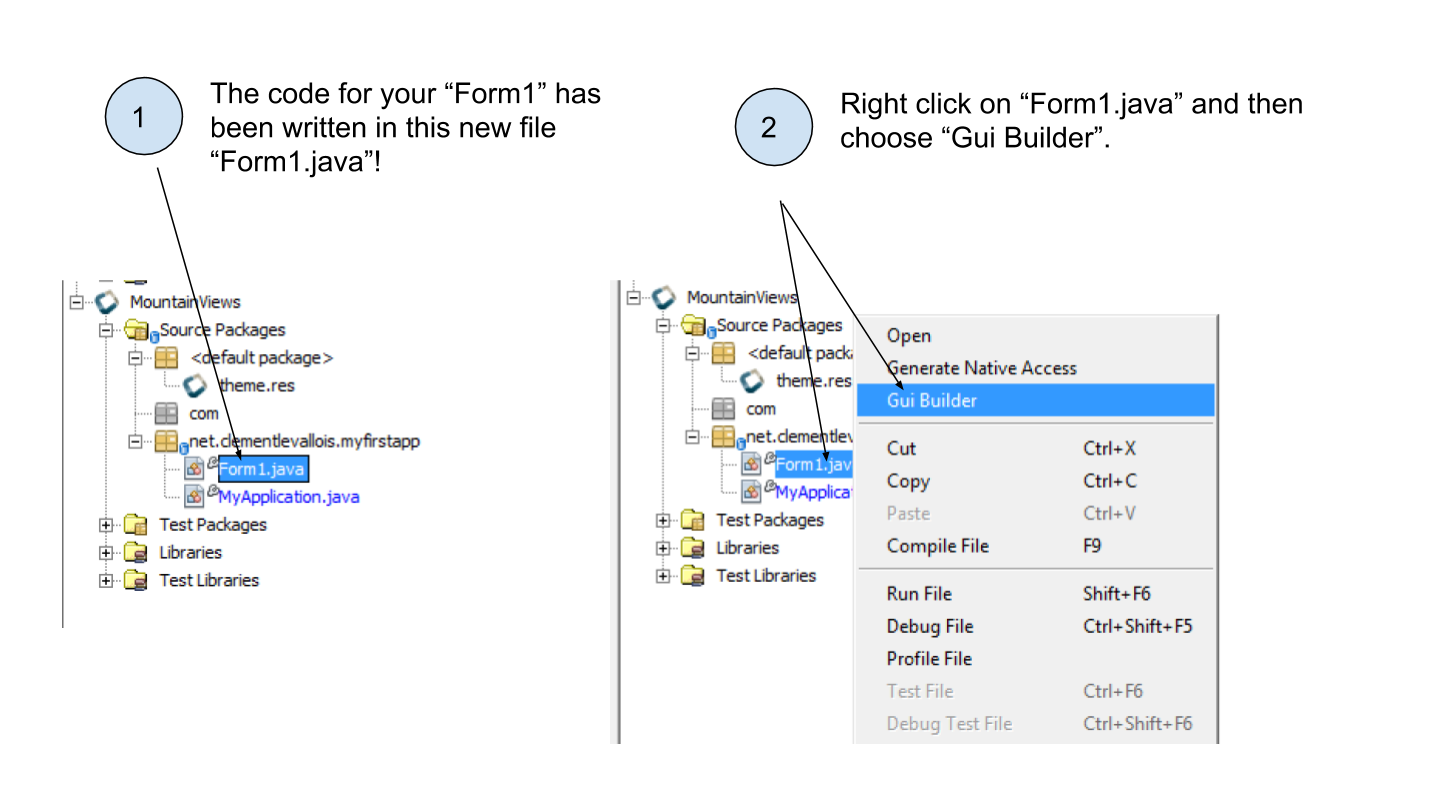
Figure 1. Opening the Form we created to work on it
So that you should now have the GUI Builder open to design your Form. Here is a recall of the different panels that compose the GUI Builder:
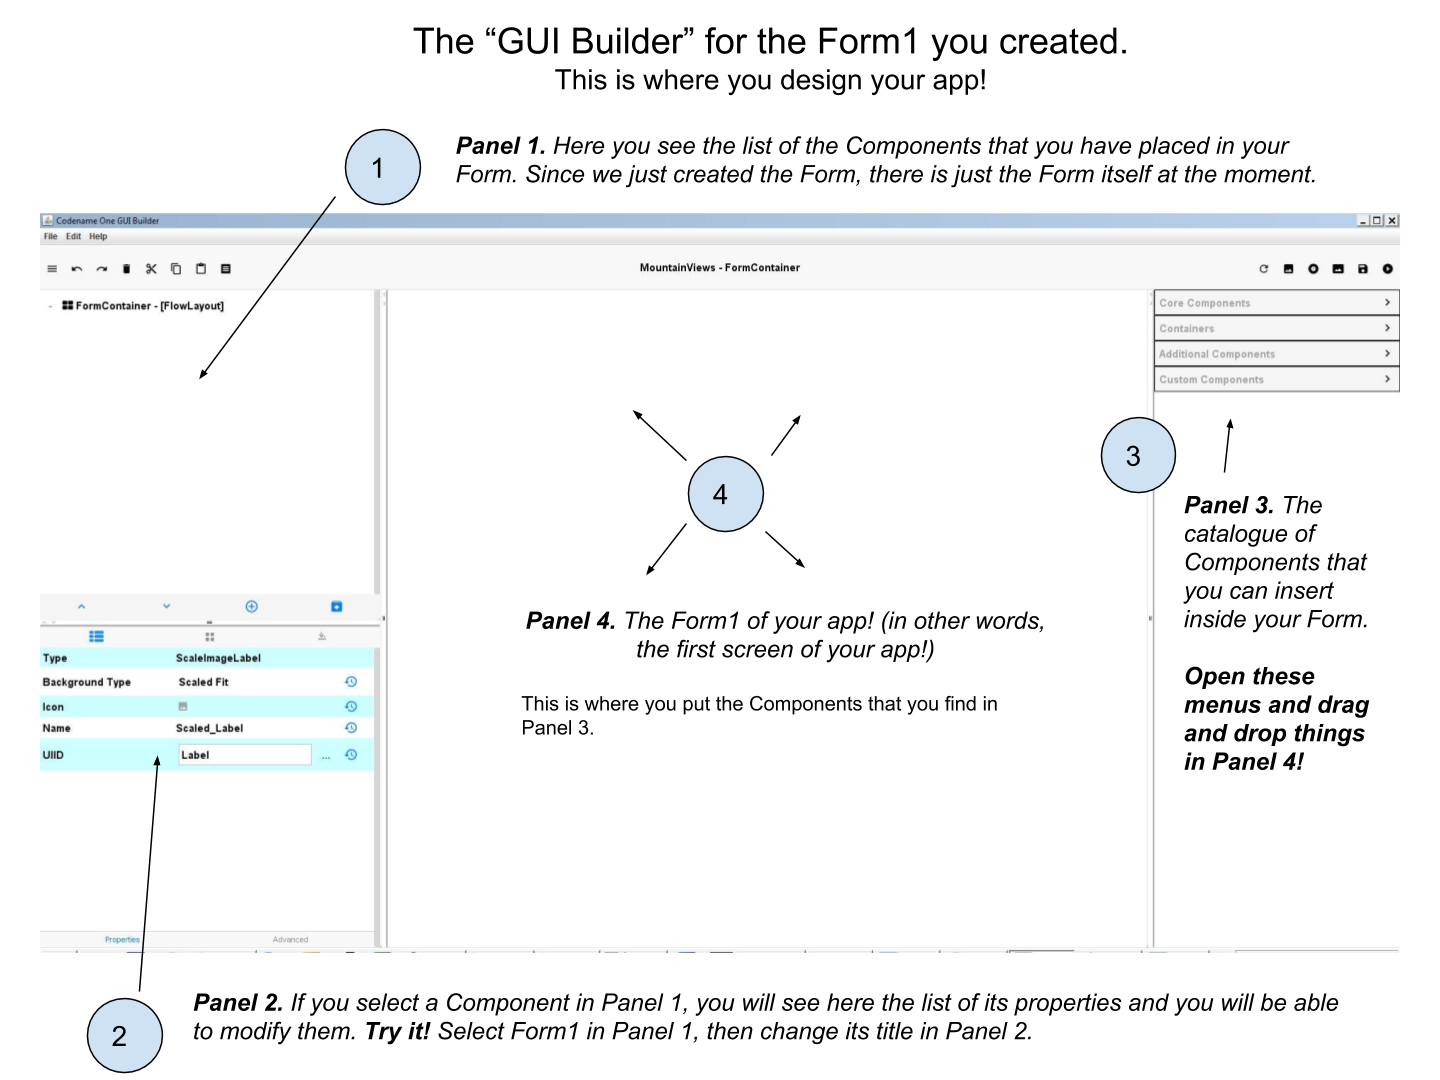
Figure 2. Discovering the GUI Builder
2. Adding a Label to your Form
a. A piece of text is called a Label. Why?
As mentioned in a previous lesson, in coding and software development, things don’t have intuitive names:
For example, a "screen" is called a Form (we have explained this one before).
Another example: every element to be put on the Form is going to be called a "Component", so make sure you memorize this.
And a Component that shows some text is going to be called… a Label. Not "Text". Why?
Simply because calling it "Text" would be misleading. When you show some text on screen there is the text itself, but also its size, color, id, etc.
→ so "Label" is more accurate: a Label is made of a piece of text and a color, a size, some decorations (maybe bold? italic?), etc.
With these explanations and clarifications made, we can now add a Label in our app!
b. Concrete steps to add a Label to the Form
Start by opening the 'Core Components' menu on the top right:
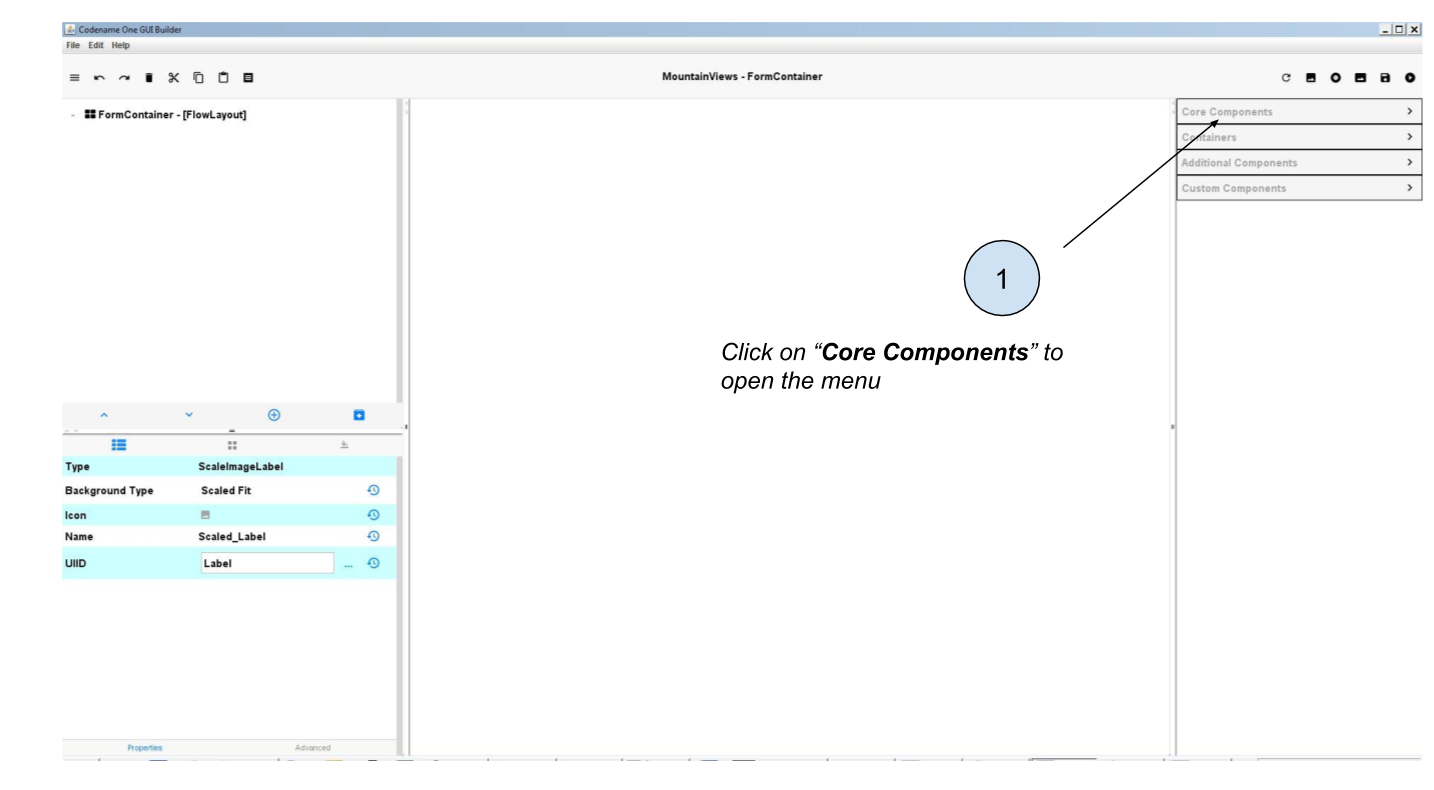
Figure 3. Opening the Core Components menu
Then drag and drop a Label onto the Form. Place it where you prefer:
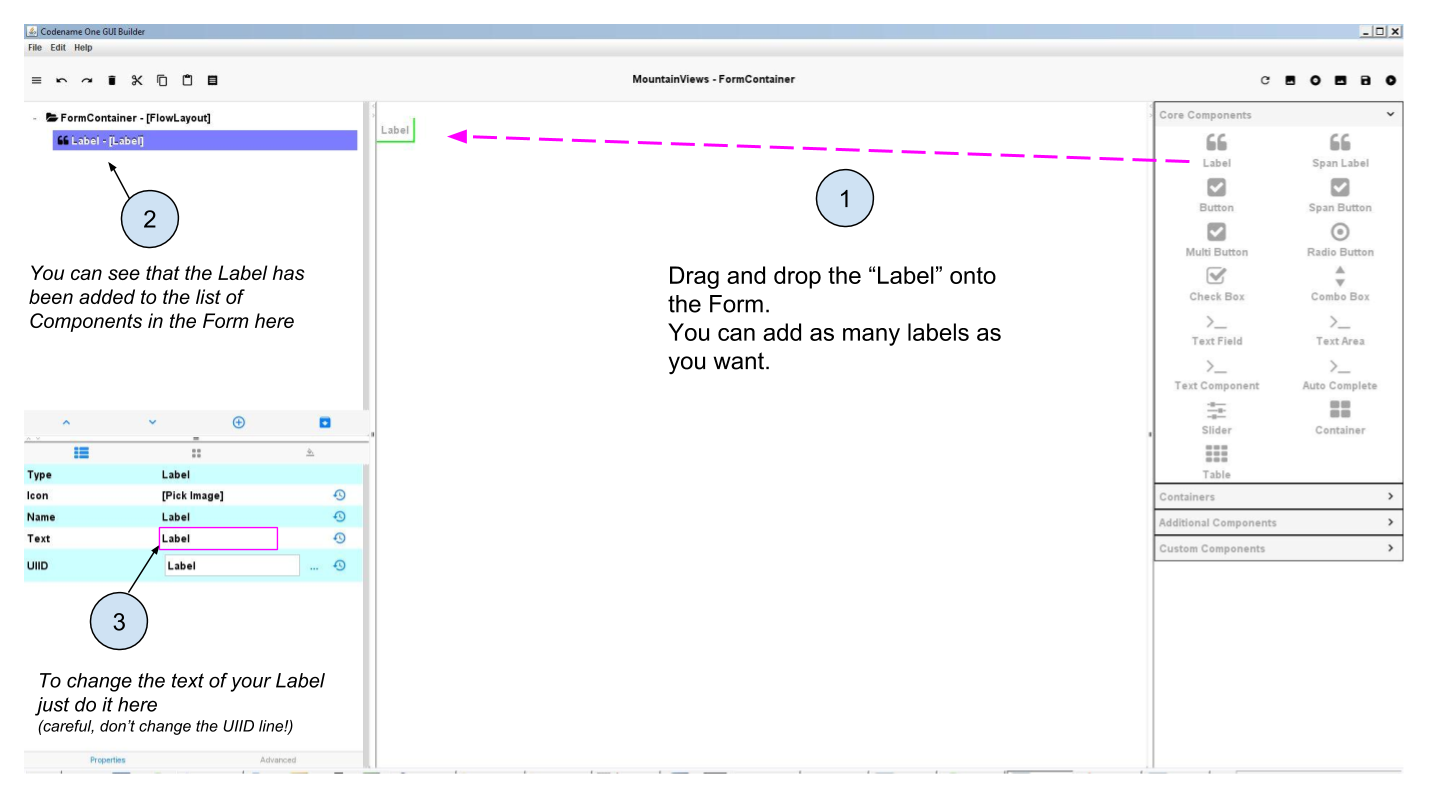
Figure 4. Drag - dropping a Label
c. Label or Span Label?
You may have noticed that a Component called "Span Label" also exists, right next to Label:
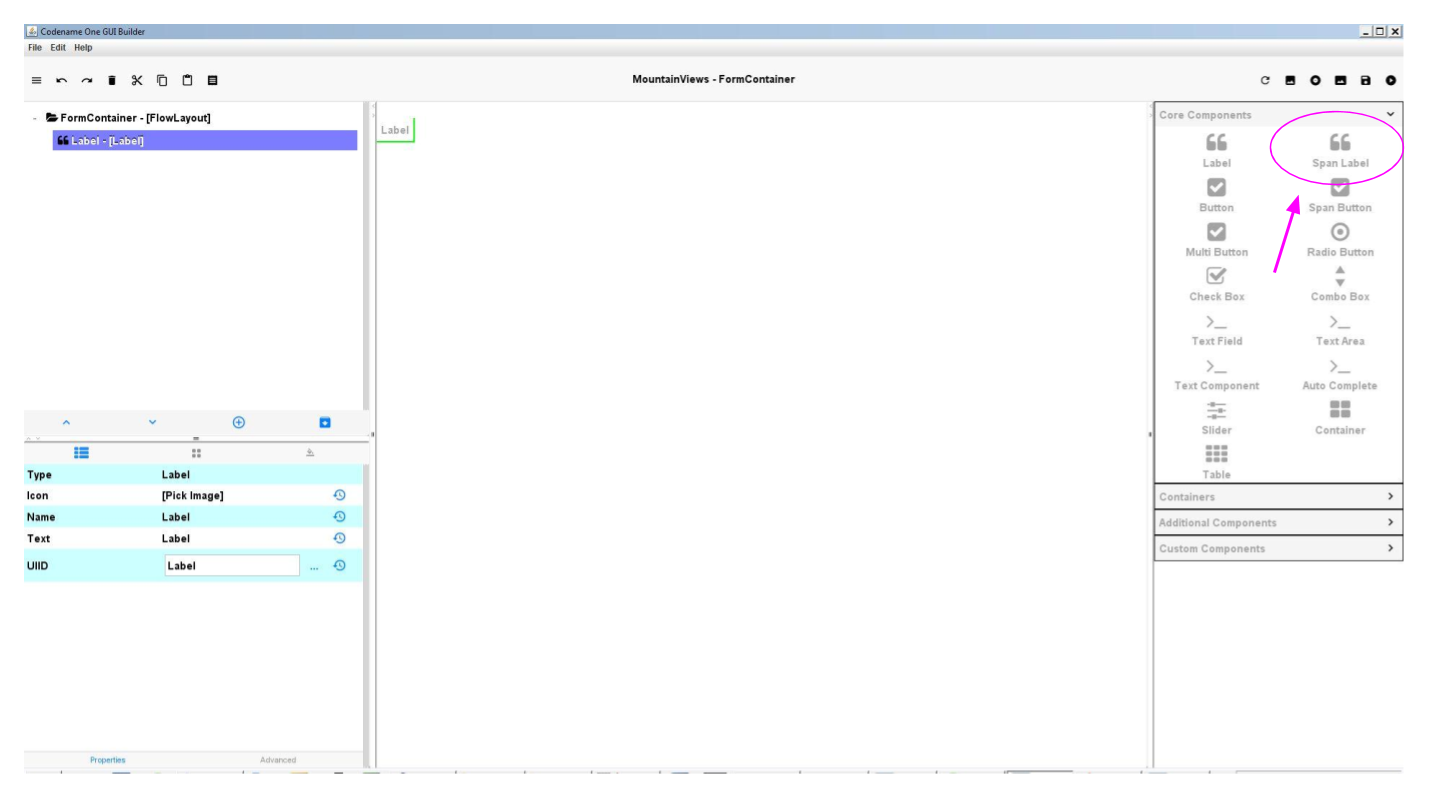
Figure 5. A Span Label
Span Labels are like regular Labels, but their text can stretch on many lines, not just one. Even if this is a tiny difference, you have cases when one is more practical than the other.
a. Adding the button
Adding a Button is easy: just like we did for Labels, we just need to drag and drop the Button onto the Form:
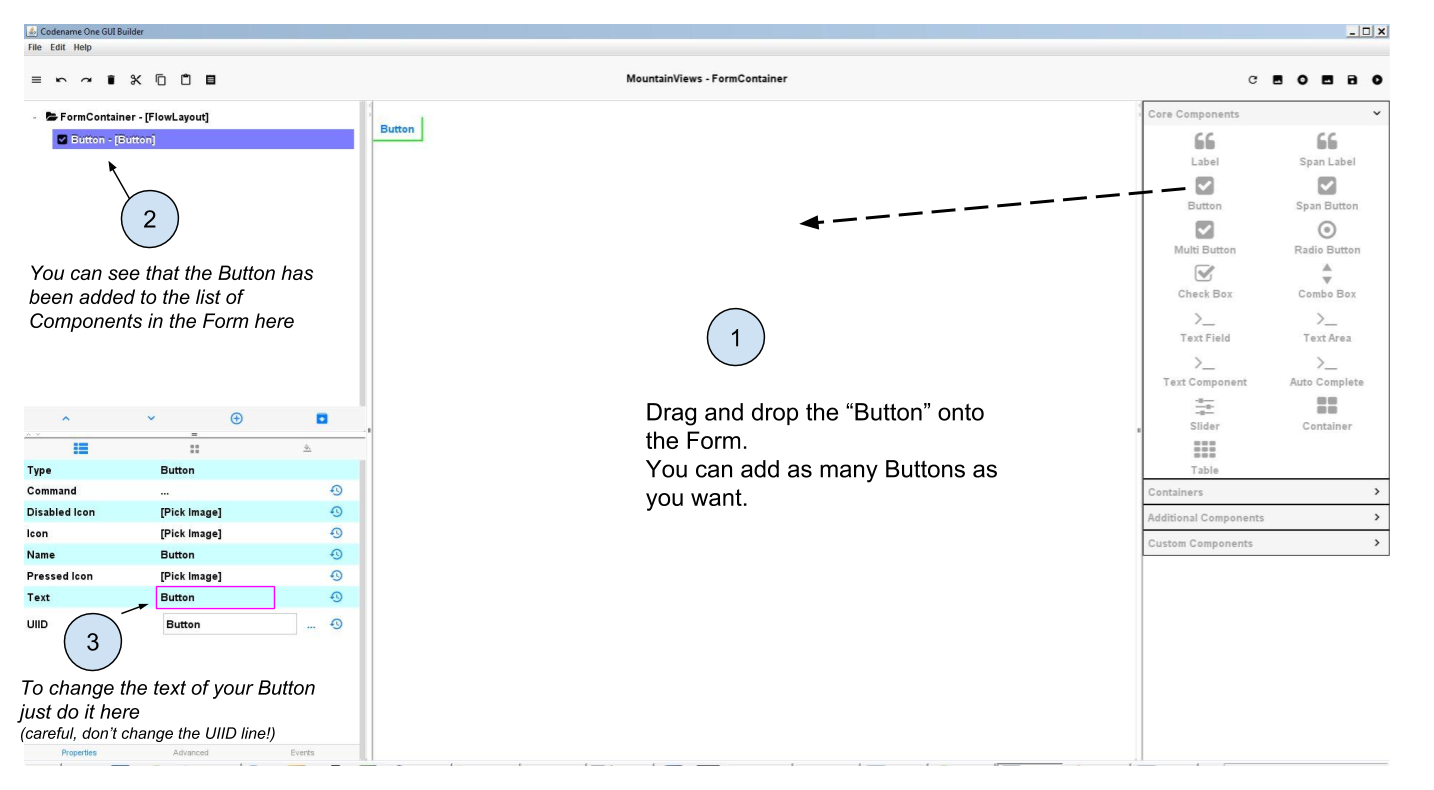
Figure 6. Drag - dropping a Button
b. Making the button do something
Of course the button, alone, is not interesting: it should do something when the user of the app touches it.
You can launch the preview of your app (big green arrow ![]() in the NetBeans menu): you see in the preview that the button can be pressed, but nothing happens. We need to attach an Action to the button.
in the NetBeans menu): you see in the preview that the button can be pressed, but nothing happens. We need to attach an Action to the button.
Actions can be very complex: for example, a gaming app has buttons making characters jump or run. Or a store app has buttons that select products and make payments…
→ All these actions happen through lines of code that need to be written.
We are going to create a very simple action to illustrate the principle: pressing the button will change the text of the Label
c. Step-by-step creation of an action attached to the button
This is not completely stable. If the creation of the action does not work well:
|
1. Make sure you have a Label on the Form - since we want to change its text with the Button!
(you should have one as we created one, above in this lesson).
2. Select the button with your mouse and click on the three dots in the properties:
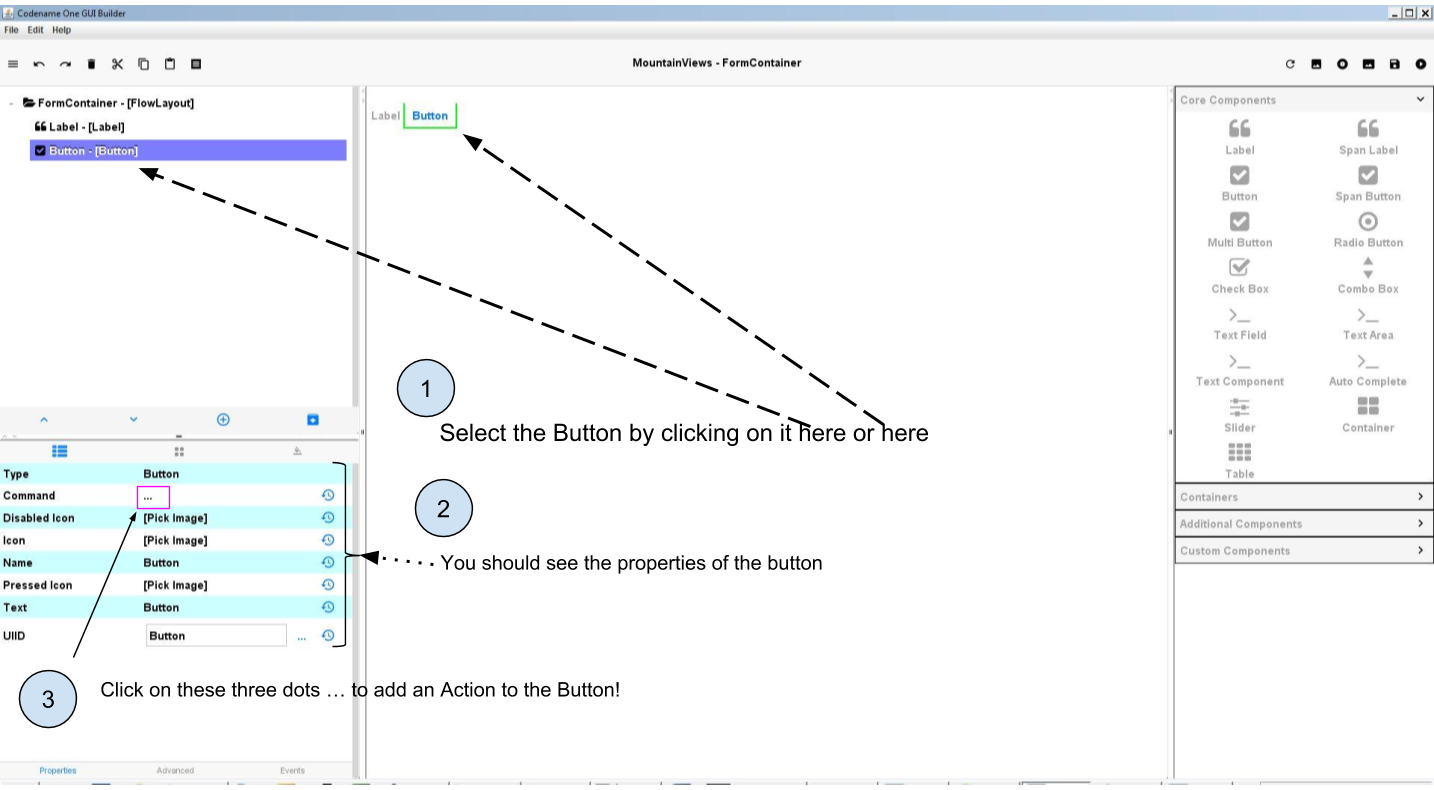
Figure 7. Selecting the Button
This opens a new window.
3. Give a name to the action and to the button
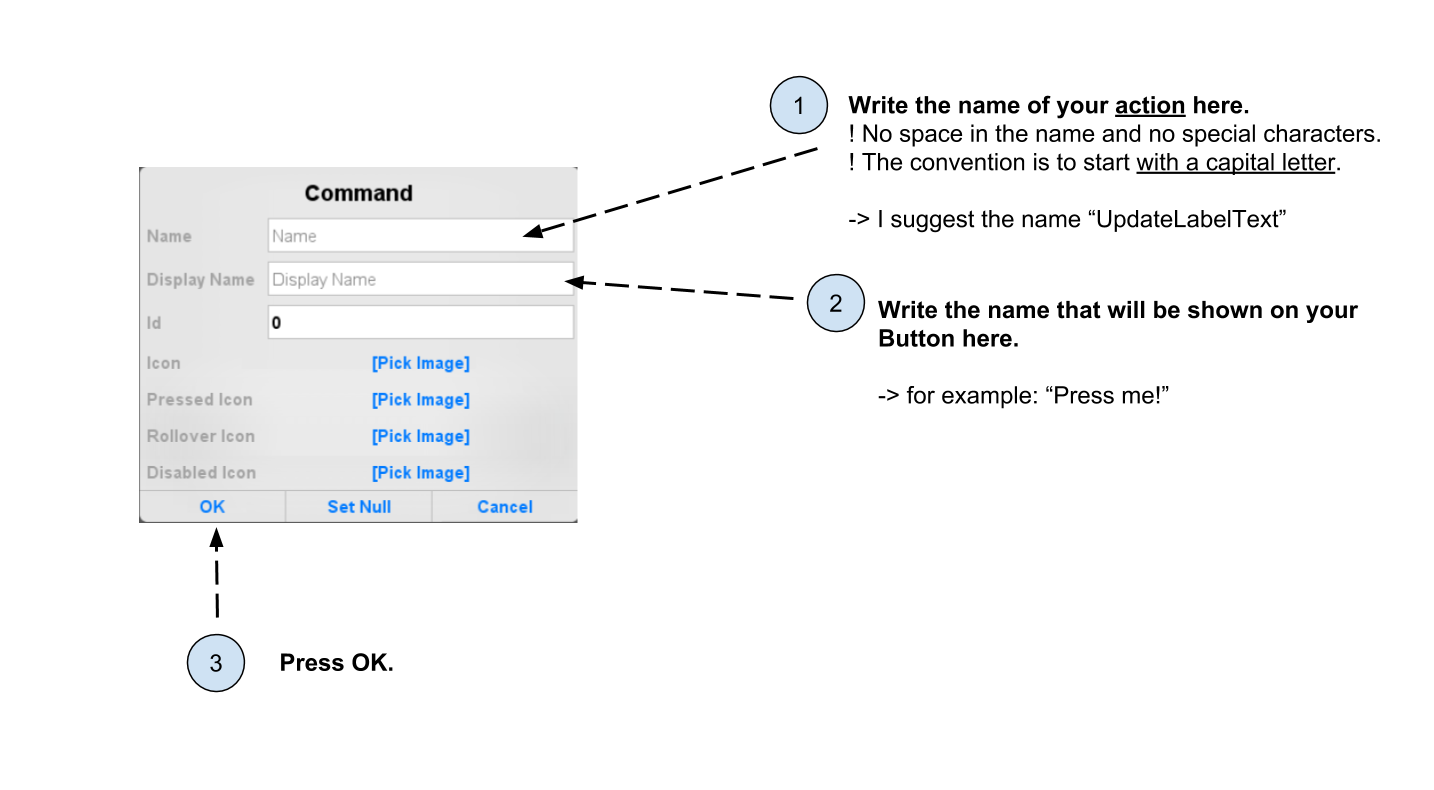
Figure 8. Giving a name to the action and to the button
You might have the idea to add a picture to your button, because you see properties named "icon" or "Pick Image". Actually, the best way to add a picture to a button is to use a "Scaled Button", not a Button. We explain how to do in the lesson on "Adding Pictures" in this module. |
4. The GUI Builder should have switched automatically back to NetBeans (don’t worry the GUI Builder has not been closed)
The lines of code for an action have been automatically written in the file of your Form, which is called "Form1.java" if your Form is named Form1.
These lines of code should look like:
Form1.java
This line is complicated but you can notice that the name of our Action appears in it ("UpdateLabelText"). Notice also the opening curly brace at the end of the line: {
This is a closing curly brace.
Everything you write between the opening curly brace { and the closing curly brace } will be performed when the user touches the button.
So let’s write the instruction to change the text of the Label!
We are going to write just one line of code between the curly braces:
this.gui_Label.setText("pressed!");Here we suppose that the Label that you want impact with your Button is called "Label".
Check the name of your Label in the GUI Builder: if it is named
|
So that it looks like:
Form1.java
//-- DON'T EDIT ABOVE THIS LINE!!!
public void onUpdateLabelTextCommand(com.codename1.ui.events.ActionEvent ev, com.codename1.ui.Command cmd) {
      this.gui_Label.setText("pressed!"); (1)
}
the line we added between the curly braces.
You can now preview your app (big green arrow in NetBeans). Press the button in the preview, the effect should be:
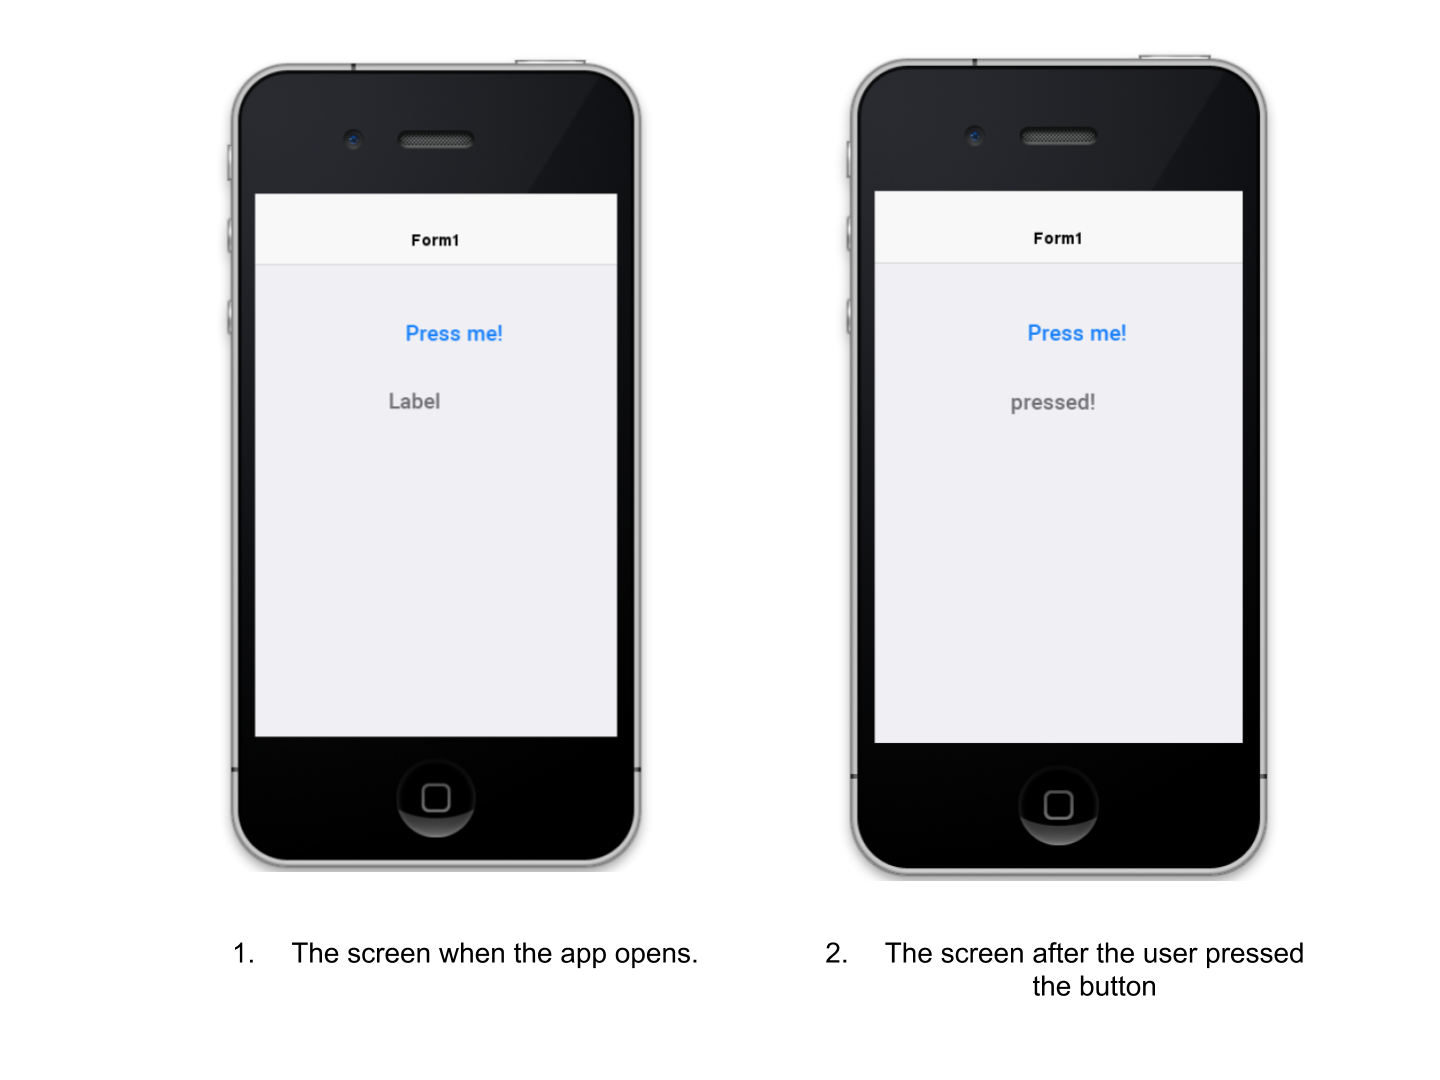
Figure 9. Previewing the button and its action
Not this result? Make sure you save the GUI Builder! (File → Save)
Congratulations! You learned how to place a Label on screen, a Button, and how to make the Button perform an action. This is a huge step! 🎉🎉🎉
In the next lesson of this module, we are going to learn how to insert a picture in the app.
The end
Questions? Want to open a discussion on this lesson? Visit the forum here (need a free Github account).
Find references for this lesson, and other lessons, here.
Licence: Creative Commons, Attribution 4.0 International (CC BY 4.0). You are free to:
copy and redistribute the material in any medium or format
Adapt — remix, transform, and build upon the material
⇒ for any purpose, even commercially.
 This course is designed by Clement Levallois.
Discover my other courses in data / tech for business: http://www.clementlevallois.net
Or get in touch via Twitter: @seinecle