last modified: 2018-03-16
1. Preliminary setup
|
Before doing this lesson you must have completed the first lesson of this module, because it includes essential steps. |
Testing and releasing mobile apps for Android phones and tablets is fairly simple, and made even simpler by Codename One, the tool we use in this course.
Here is the list of what you’ll need:
b. Create A developer account on Google’s Play Store (25$)
You don’t need this step if you just want to test your app on your own Android phone.
|
em lyon business school students: we provide you with a free access to a Google Play Store account. You will receive the invitation by email. You can ignore this and move on to the next part of this lesson. |
To release your app on the Play Store, you need to create an account.
Visit the webpage to sign up for a Google Play developer account: https://play.google.com/apps/publish/signup.
A one-time 25$ fee for a lifetime membership to the Google Developer Program is requested.
With this fee you can distribute an unlimited number of apps, without limit of time.
c. Set up your phone to accept apps from unknown sources
This step is necessary only for testing the app on your phone. For security reasons, your phone accepts to install only apps coming from the Google Play Store.
You must unlock this feature so that you can test your own app.
The latest versions of Android will invite you to unlock when you are installing your app, but on older phones you need to do it beforehand:
-
go to the parameters of your phone
-
in the security settings, switch on the "install from unknown sources".
This website provides an illustration:
(Depending on your phone and version of Android, your screens will look slightly different)
|
Make sure to switch off this parameter after you installed your app. |
e. Connect NetBeans to your Codename One account
In NetBeans, right click on the name of your project and select Properties:

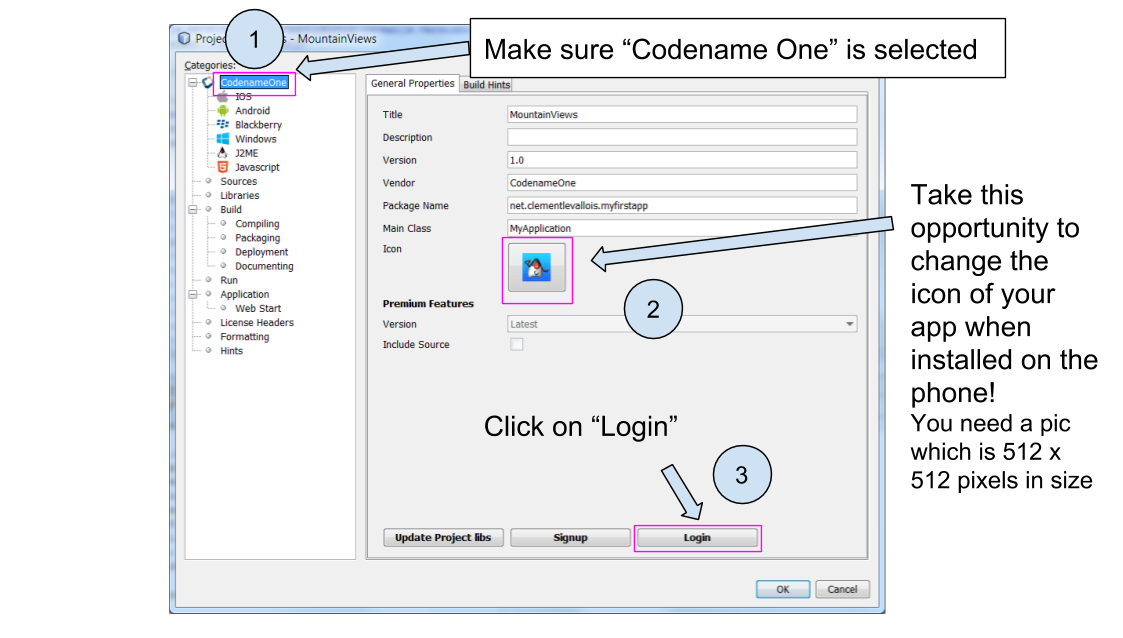
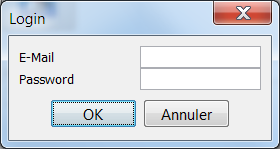
A login window opens. You should enter the email and password of the account you created on the Codename One website (see above in the lesson).
This is how NetBeans will be able to send the app you created to the Codename One website!
Then close all the windows we opened by clicking on OK.
You are almost ready to send your app to Codename One.
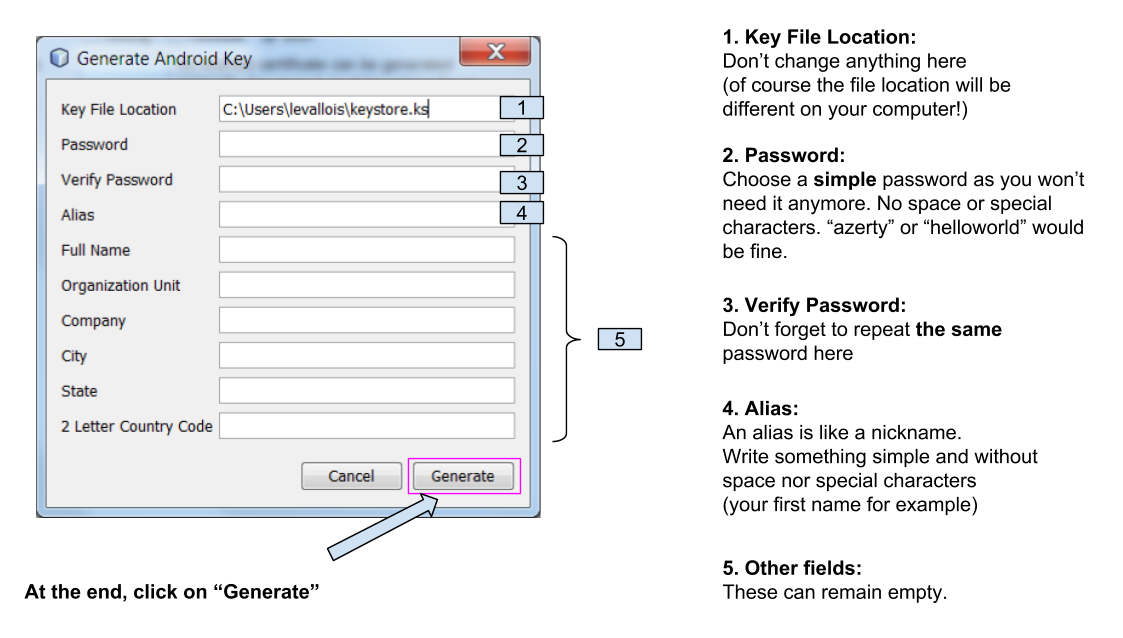
The last step consists in generating a Google certificate for your app.
f. Generate a Google certificate for the app
A certificate is the unique and "tamperproof" ID of your app. It is used by Google to make sure that your app is indeed the one it claims to be, and not one corrupted by a third party.
Generating certificates can be a long and painful process (watch the lesson on certificates for iPhone apps and cry…). Luckily, Google’s process is simpler, and Codename One makes it even simpler.
Follow these steps:
Return to the Properties of your project:
You can now access the Android settings of your project. Be extra careful in following these instructions as mistakes are particularly frustrating to debug:
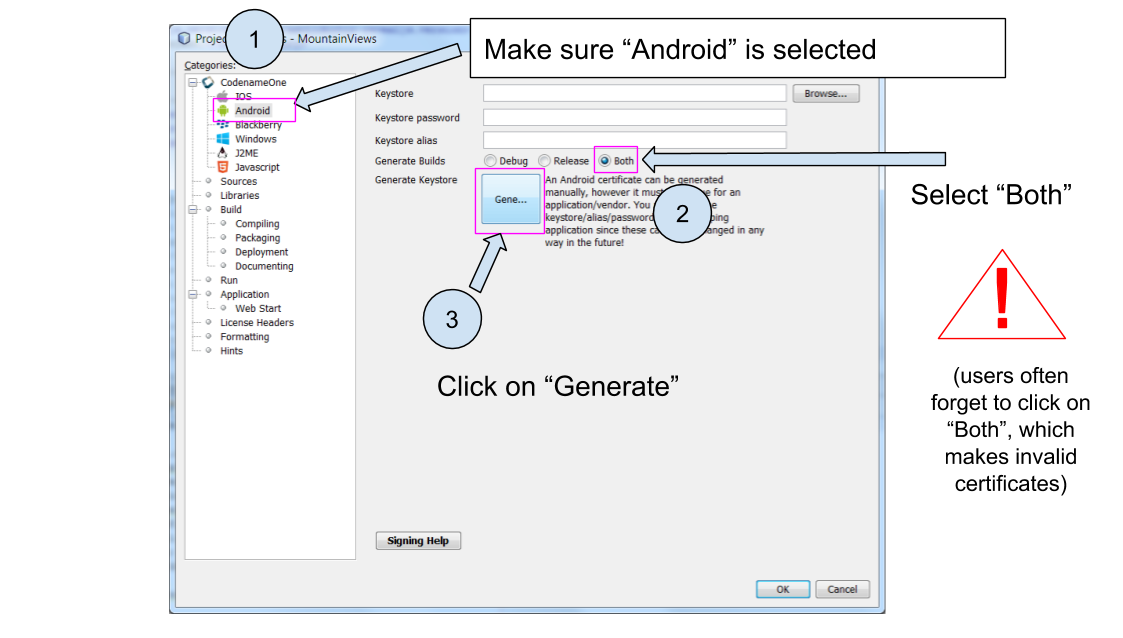
Your Google certificate is now generated! Close the properties of the project by clicking on OK and be ready to create the Android version of your app!
2. Launching the build
With all the setup completed, we are nearly finished.
Launch the build of the Android app by right clicking on your project’s name:
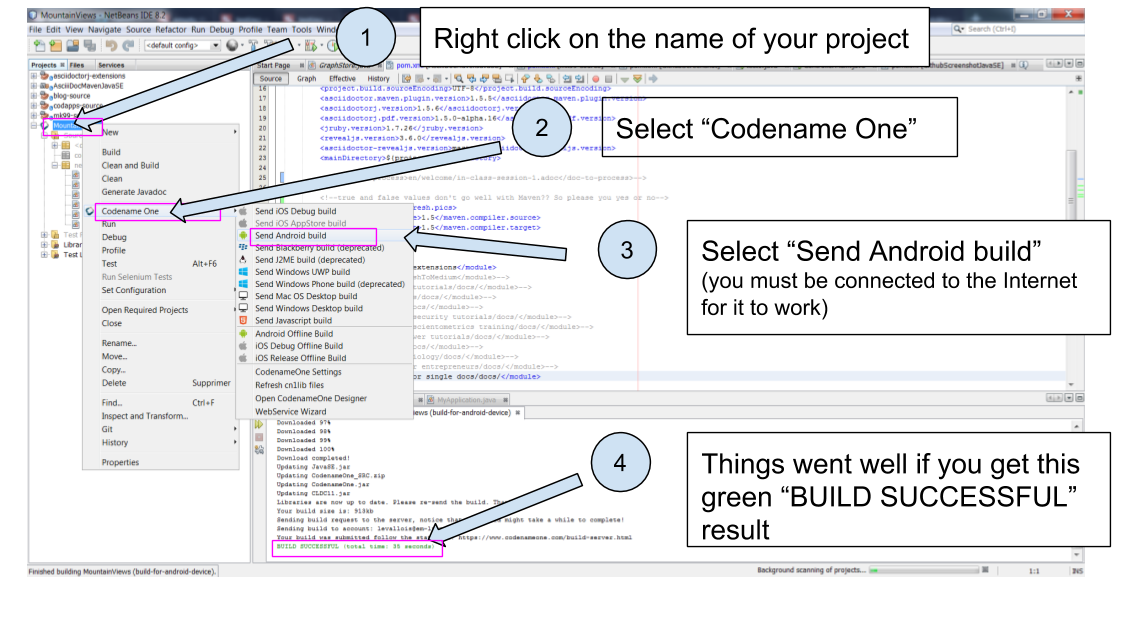
If you get a "Build failed" message at the end, don’t worry this is very common not to succeed at the first time.
Read the lesson in this module about possible causes and solutions.
If you get a successful build, continue here:
Now you should open your web browser, go to http://www.codenameone.com and login to your account.
Then go to the Dashboard:
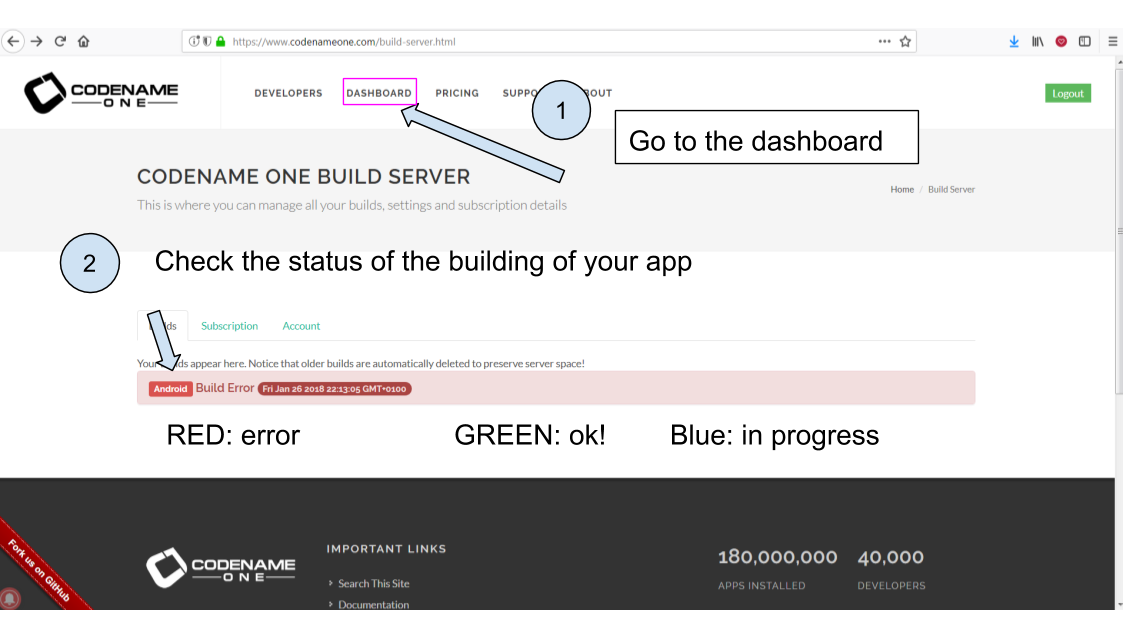
If the build is green and successful, you can go ahead and follow the next instructions below.
If it is red, again this is quite usual the first times. You can read the special lesson in this module to help you diagnostic and solve the error.
Ok, assuming your build was successful and "green", click on the date and time shown on it:
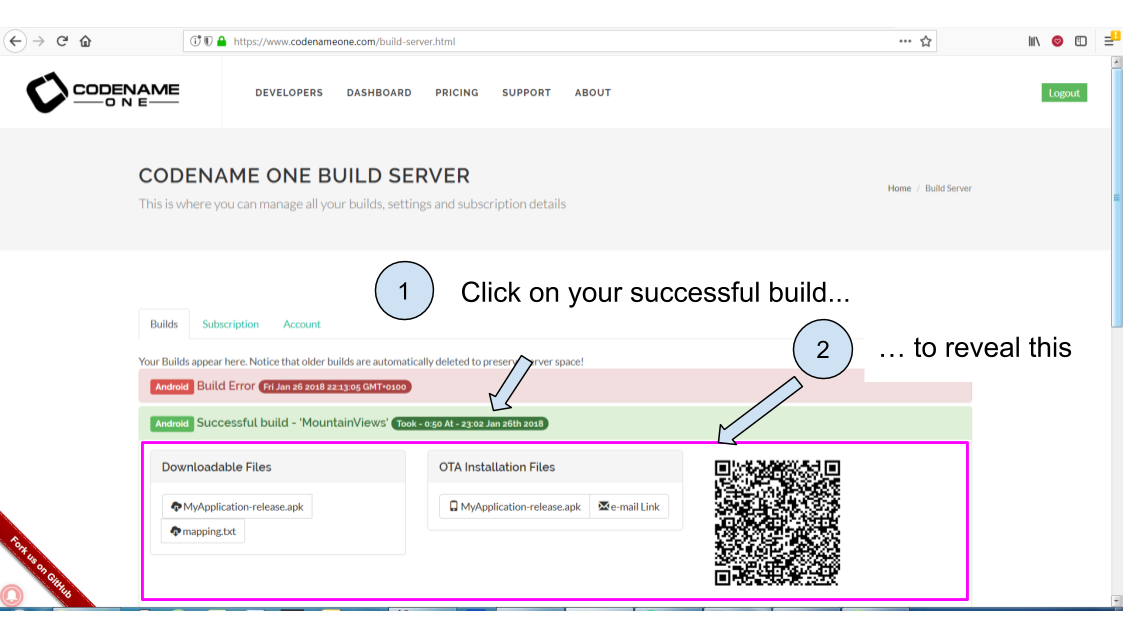
And now, you can simply test your app on your Android phone, or publish it on Google’s Play Store.
Let’s see how:
3. Testing the app on an Android Phone
-
Take your phone and open the QR code reader app that you installed on it.
-
Flash the QR code displayed on your successful build on www.codenameone.com.
-
Your app should install on your phone (follow the steps / confirm)
-
go and find the icon of your app on your phone, open it and enjoy it!
4. Publishing your app on Google’s Play Store
|
The app, once published on the Google Play, will be public. Make sure your app does not include personal content (pictures, personal details…) that you do not want to get public! |
Download the "apk" file on your computer. This file is your Android app!
(if you are curious, apk stands for Android package)

Now, login to your Google Play Developer account at https://play.google.com/apps/publish
-
we created this Google Play Console account in one of the steps above
-
em lyon business school students: log in to your account by following the instuctions you received by email.
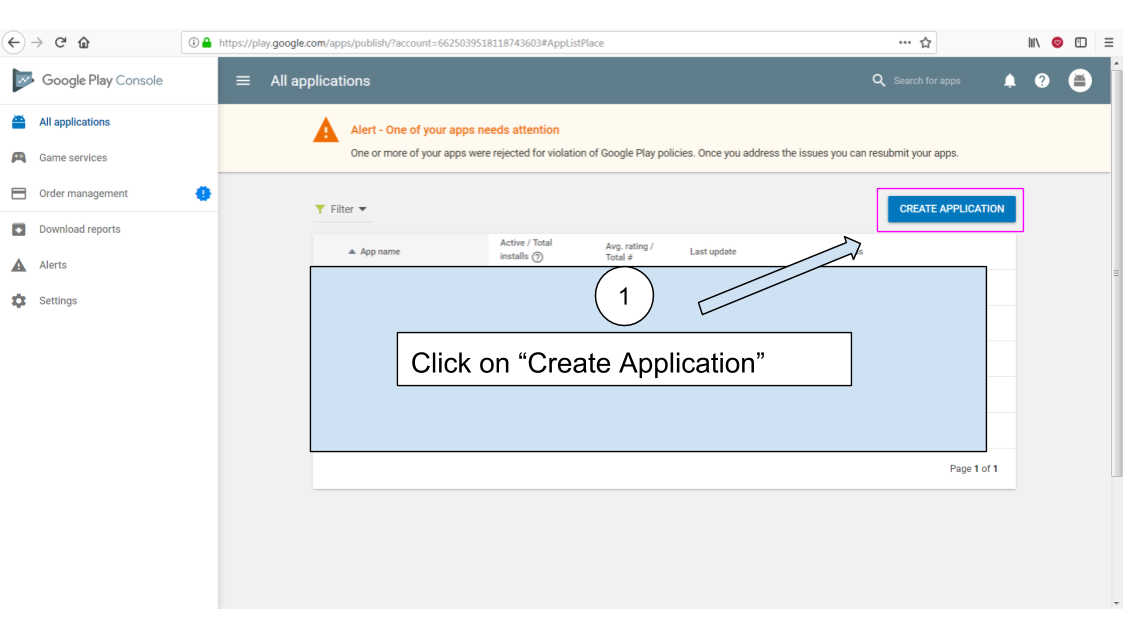
You now have access to the menu for your app.
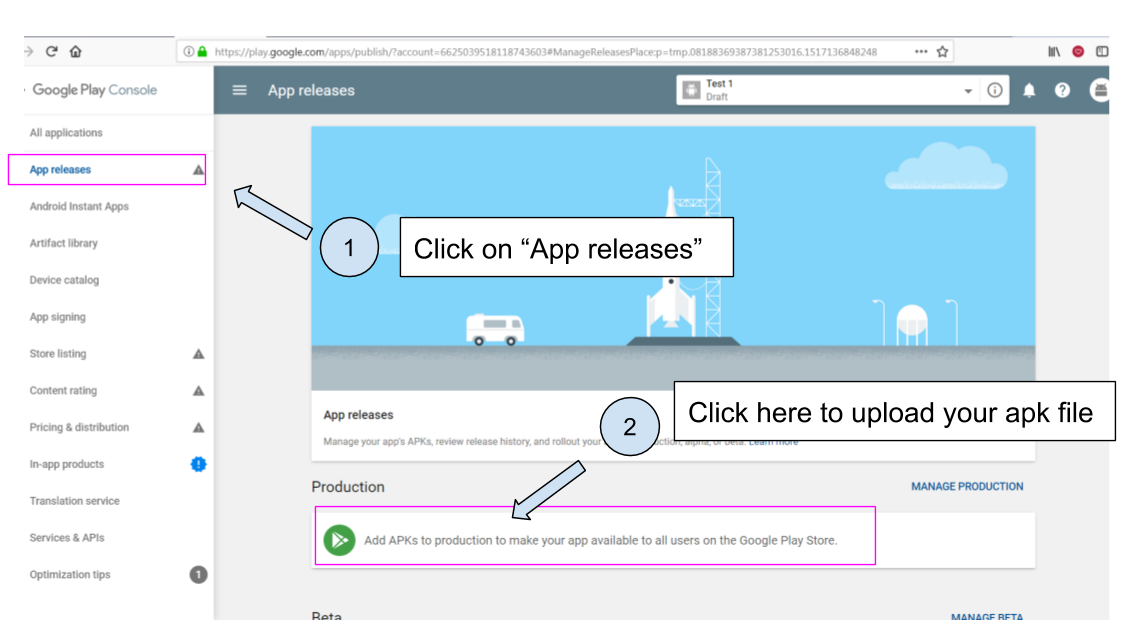
Upload your apk here:
The Play Store now requires that you add screenshots of your app to market it.
There are a number of screenshots of you app to create and upload, each at precise pixel size. You will find help and indications here.
This website might also be useful to create the screenshots: http://www.appscreenshot.me/
Finally, there are a number of parameters for you to set. They are shown with an "alert sign" icon on your page:
When all these parameters will be set, your app will become publishable.
The end
Questions? Want to open a discussion on this lesson? Visit the forum here (need a free Github account).
Find references for this lesson, and other lessons, here.
Licence: Creative Commons, Attribution 4.0 International (CC BY 4.0). You are free to:
-
copy and redistribute the material in any medium or format
-
Adapt — remix, transform, and build upon the material
⇒ for any purpose, even commercially.
 This course is designed by Clement Levallois.
Discover my other courses in data / tech for business: http://www.clementlevallois.net
Or get in touch via Twitter: @seinecle